Photoshop - "Disco" effect
Starting from image from the figure 1 we will create the "disco" effect which was very popular on the posters and the video clips of the 80's.
For start we will delete the background behind the character. In order to do this we will use the Magnetic Lasso Tool and we will select the contour of the character. Don't worry if the selection is not perfect ! 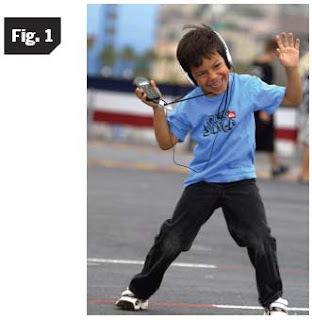 It can be corrected afterwards using the instrument Polygonal Lasso Tool and one of the selection method "Add to selection" or "Substract from selection", depending on what you need. An example of imperfection can be noticed on figure 2. It will be corrected using "Add to selection" because the initial mask did not covered the entire contour of the device from the kid's hand.
After completing the selection run the command Clear from the Edit menu to delete the silhouette.Press the X key to invert the background color and the main color (supposed that this have the black and white values as default). 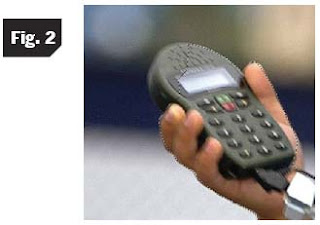 After that, run the command Inverse from the Select Menu to invert the selection, followed by the Clear command from the Edit menu again to delete the background. At this moment we can cancel the selection (De-select command from the Select menu). The result is shown on the figure 3.
Duplicate the Background layer (right click on Background in the Layers Panel, then choose Duplicate Layer from the menu). This new layer will be named "Effect", which will be duplicated again using the same procedure, and the new layer will be named "Silhouette". This will contain the silhouette of the dancer and will always be on top of all the other layers.
We must add to this layer a mask in order for just the silhouette to be visible. Select layer "Silhouette" from the Layers panel. Click once inside the white silhouette of the dancer with the Magic Wand Tool instrument. From the Layer menu choose the Add Layer Mask command -> Reveal Selection. The background can then be erased, using the following steps. Select the Background Layer from the Layers panel, then choose the command All from the Select menu, then the Clear command from the Edit menu and Deselect command from the Select menu. You will then have to see what is shown in the figure 4.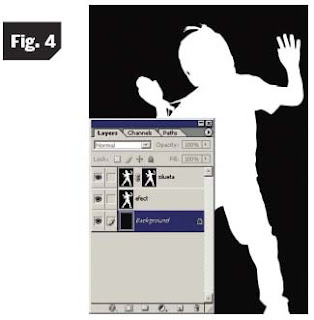
The Background and Silhouette layers will remain unmodified. Between them we will add effects layers. Select the Effect layer and apply one by one the next filters: Filter ->Stylize->Find Edges, then Filter->Stylize->Glowing Edges with the parameters Edge width =9, Edge Brightness=13, Smoothness=6. You will get what you see in figure 5.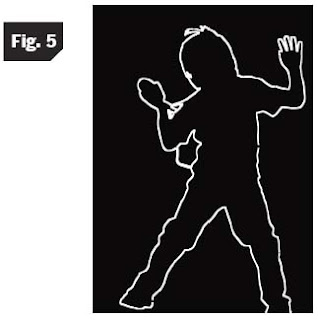
This contour can he colored using the Paint Bucket instrument.
In this case use the yellow color. From the Filter menu choose the Blur command->Radial Blur with the parameters Amount =47, Blur Method =Zoom, Quality = Draft, getting what you see in figure 6.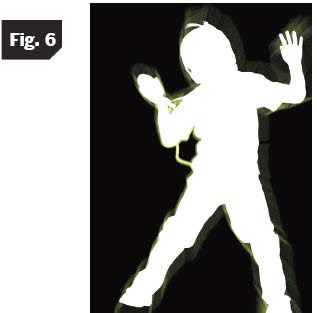
For the final step, the Effect layer will be duplicated several times and moved/scaled using the command Edit -> Transform -> Scale. You can also change the color of each copy (using the command Image -> Adjustments -> Color balance) to create a rainbow effect. After copying for 5 times the original, the result should look like in figure 7.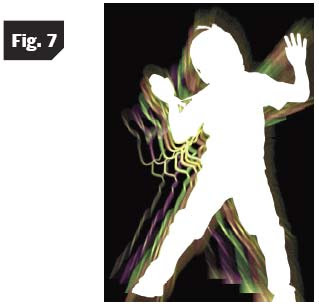


6 comments:
訳アリで家出した少女が神様の救いを待つ神待ち掲示板です!家に帰りたくない、帰れない少女達に愛の手を差し伸べてあげませんか
今年のクリスマスも後少しですね。グリー内でもクリスマスに備えて異性と交流を持つコミュニティが活発で、自分も今年のクリスマスにお陰で間に合いました!!みなさんもイブを一人で過ごさなくても良いように、グリーで異性をGETしよう
寂しい未亡人の為の出会いコミュニティサイトで毎日欲求不満で過ごしてしまっている淫らな彼女たちと燃えるような激しい一夜を過ごしませんか?
Hチェッカーを使ってちょっと遅めの新年会を盛り上げませんか?アルコールが入りテンションが上がると、必ず話題に上る下ネタに使いませんか。受ける事間違いなし
facebookでは様々な出会いや新たな仲間を探すことができる出会いのソーシャルネットワークサービスです。facebookを通じて新しい出会いをたくさん見つけましょう。あなたにぴったりの人と出会えるはず!
早く童貞を捨てたいと思っているあなたにピッタリのサイトが誕生!このサイトで長年守っていたあなたの童貞がついに奪われる!?あなたの童貞卒業を優しくサポートしちゃいます☆
Post a Comment